Monday, October 30, 2023

Bona Lisa's Sweater Emporium 2024 BOM

On our Facebook page, Cackling Stitches, Joan at Moosestash Quilting, Carla at Creatin' in the Sticks, and I have a block of the month (BOM) that is all about Halloween. It starts in January and ends 6-7 months later. 

We've been working our brains and fingers to the bone for the last few months and came up with this wickedly wonderful idea: "Bona Lisa's Sweater Emporium". It really got us excited and very creative!


The blocks are free the month they are released, but after that you have to buy them from our Etsy stores. The whole pattern will also be available in January for those who can't wait for each month's block(s). 


I hope you'll join us!

Fabric requirements and info can be found HERE.

FYI...

Just Let Me Quilt and Moosestash Quilting have monthly blog hops.
If you'd like to be notified when new hops are announced,
send me an email saying it's okay to add your email to our list.
They will not be shared by Joan or me.


Friday, October 27, 2023

New Blog Hops Coming In 2024

We're off and running with 2024 blog hops!
I hope you'll join us!

We've added something new for those who want to play along.
If you don't have a blog, you can play along with your Instagram or Facebook account.


What is a blog hop? It's like a "show and tell" online or like joining a quilt guild without leaving home. 
Joan from Moosestash Quilting and I post a challenge on our blogs and those who want to join in email us with their blog, Instagram, Facebook info. 

After we get that info, we assign a date for them to post their project. We give everyone plenty of time to sew something, usually two months. We inspire each other with projects, tutorials, or  patterns. Anyone can follow along! 

JANUARY BLOG HOP CHALLENGE


Challenge: 
There is a tradition for people to say “white rabbit” first thing in the morning (have you ever heard of this?) The phrase is supposed to bring good luck for the rest of the month. Even President Roosevelt did this!

Make something with white fabrics, rabbits, or white rabbits. 

If you want to play along, email me!


What is a tradition you follow?

Carol Swift

Wednesday, October 25, 2023

It Is A Monster Mash Day 4 - My Day Too

 Joan at Moosestash Quilting really knows how to frighten up some spooky
Halloween quilt projects. She's totally a witchy lady!

I saw a quilt panel earlier this year and I had to have it.
It was Steampunk and Halloween...a perfect combo.

Then I needed all the Halloween fabrics to go with the panel.
You all know how this goes and why our fabric stash never shrinks.

I bought the Halloween Steampunk fabrics and I saw a Christmas Steampunk kit 
while I was looking at the Halloween fabrics. Of course, I bought it, too,
but that's for another Christmas blog hop someday. It's a hopeless situation! LOL


My friend asked if she could have the quilt. I was too scared to say "no."


I've been busy working on another Halloween project, "The Quilted Witch" by Lori Holt.
I can't wait to put all the pieces together!


Check out all the "Monsters" posting this week!


The next two blog hops have a few openings if you want to play along.


Monster Mash Day 3

 It's been a crazy mixture of Monster Mashing going on this week!
I'm loving it!

Wednesday, October 18, 2023

Rolling Ironing Board And The Witchy Quilt

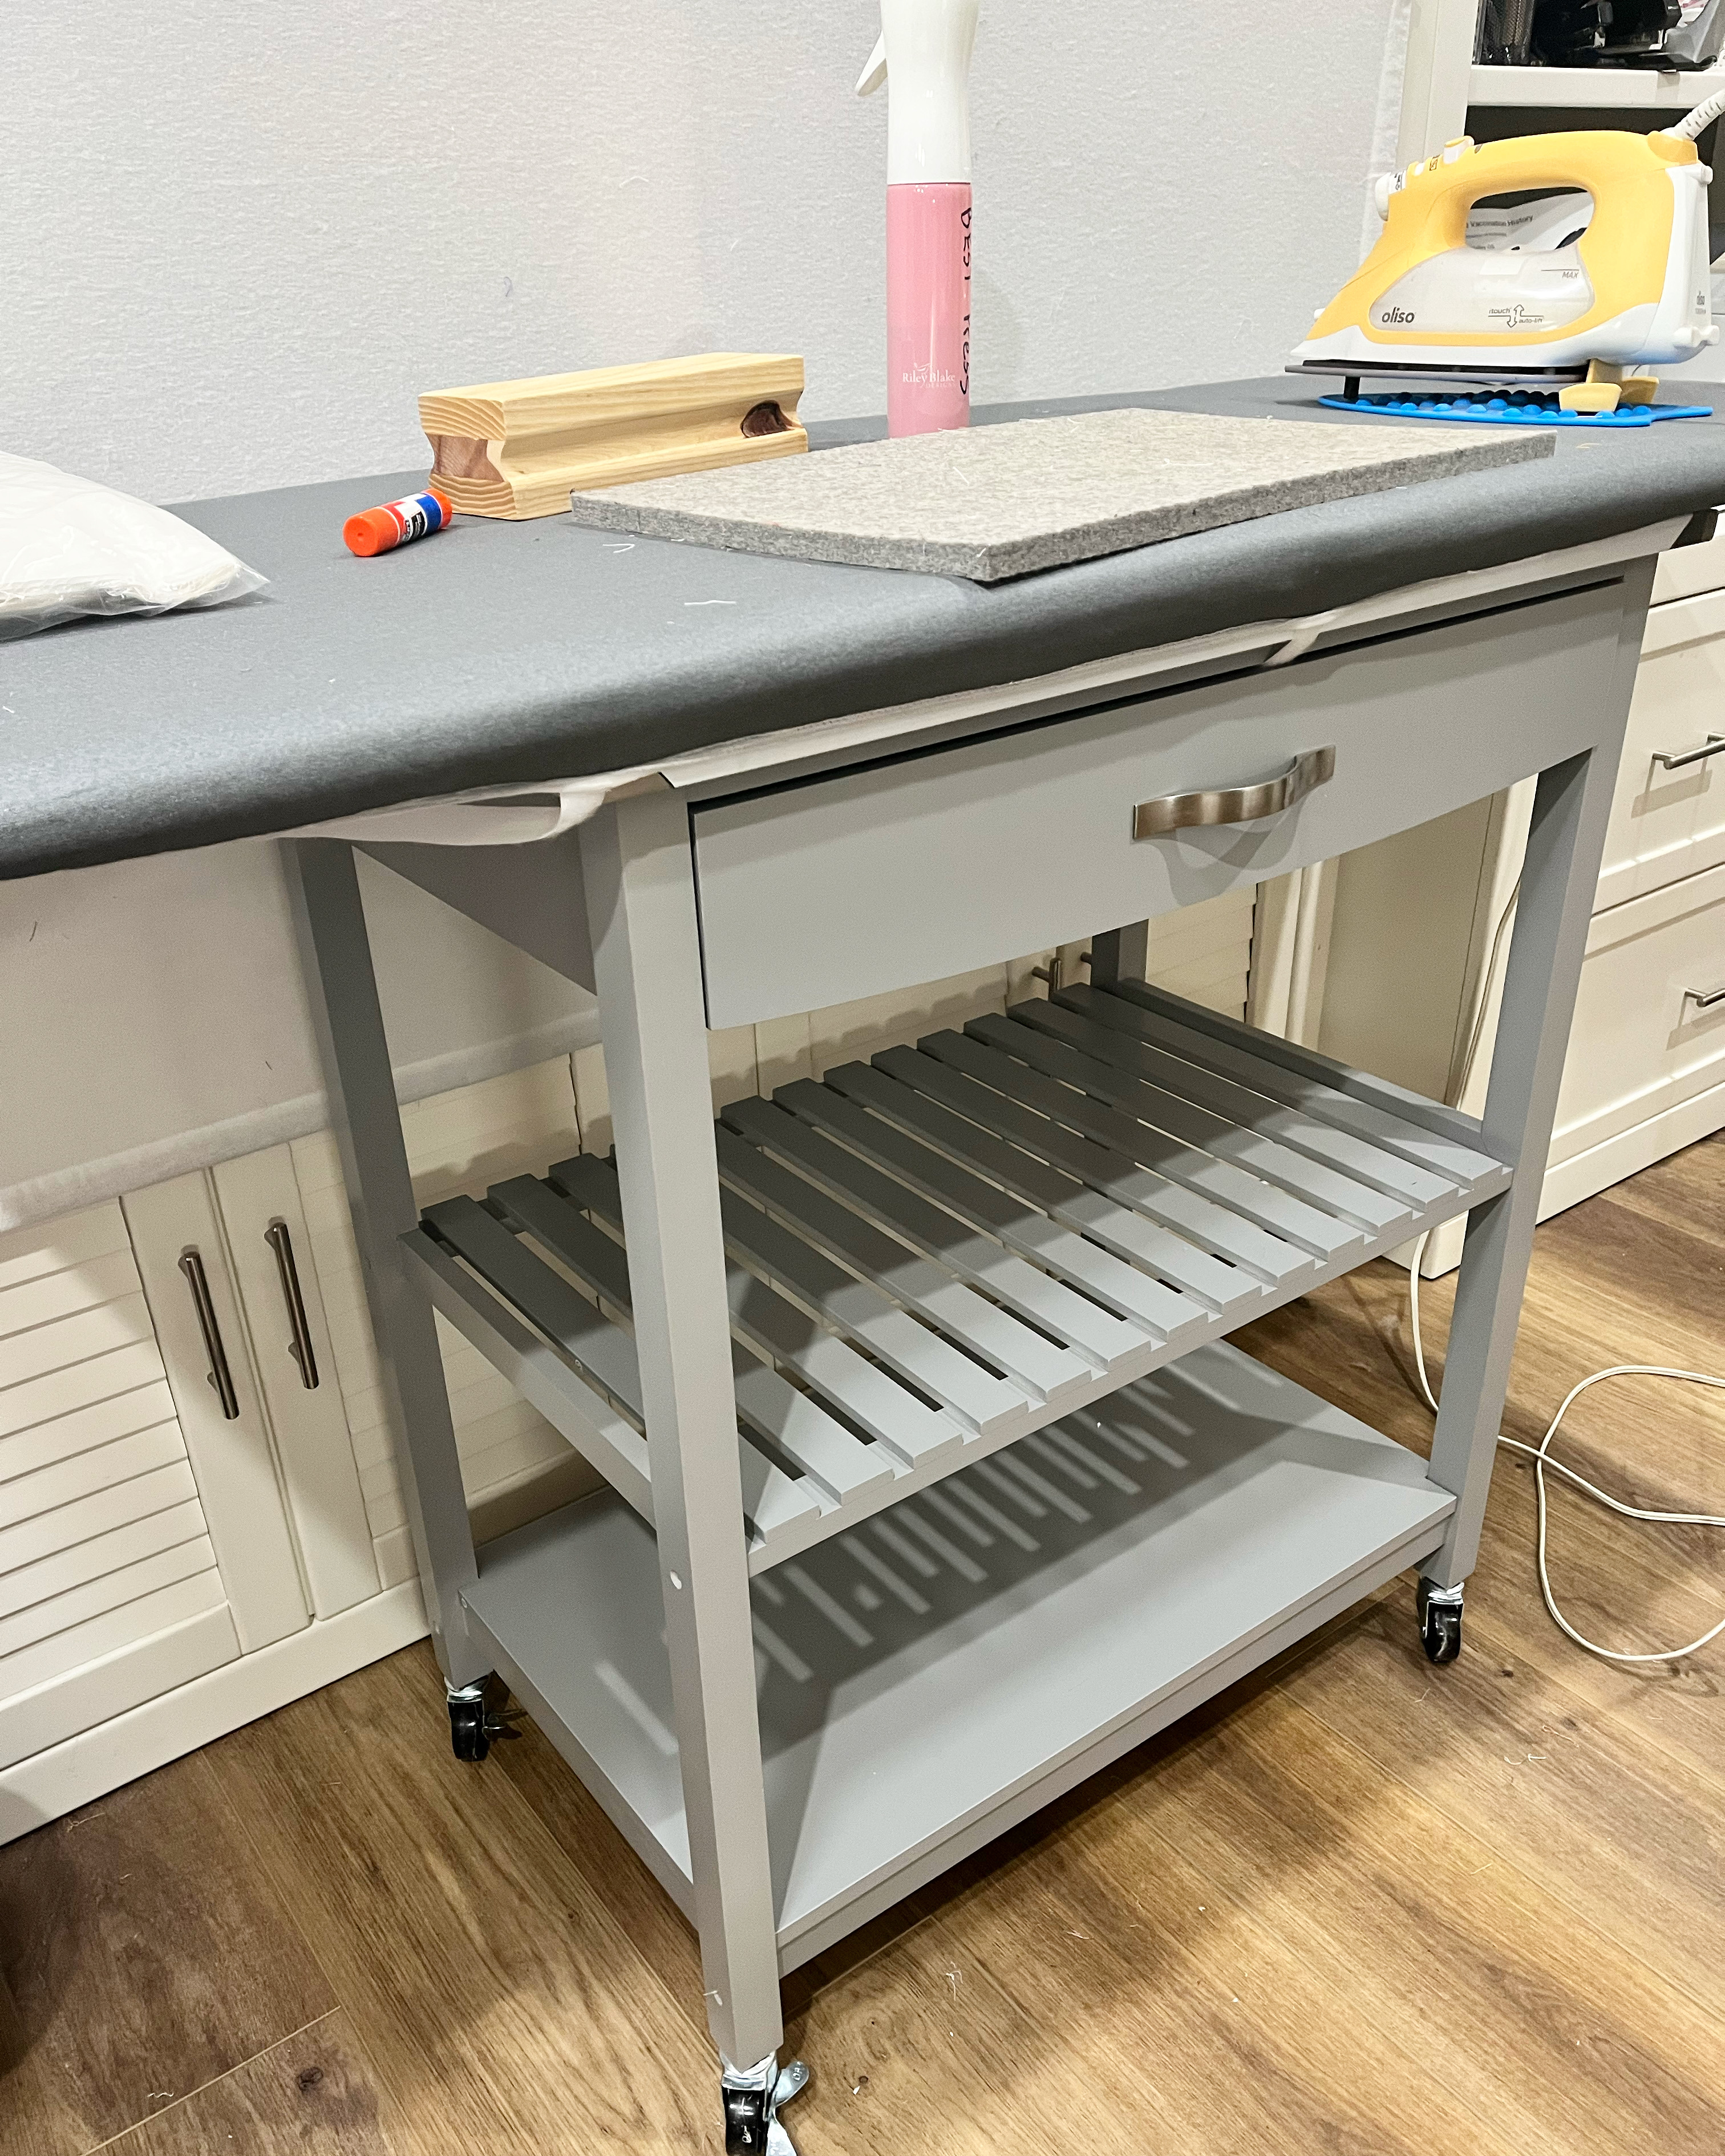
With the help of my crew, I turned my big Sullivan ironing board into a solid and movable way to press all those fabric projects. I'm loving it! 

The ironing board easily sits on top of the cart and the Velcro strap slipped through the
drawer area. The board is heavy enough that it doesn't slide around.
The wheels are a fabulous bonus to roll this thing where I need it.
It's about 35"-36" tall with the wheels and board.

I bought the ironing board online from Joann's and the microwave cart and board cover from Amazon.
Here are the links (I'm not an affiliate):

The big rectangle ironing board can be found HERE.

The ironing board cover can be found HERE.

The microwave cart can be found HERE. It comes unassembled.
The drawer has been great for holding my clapper, glue stick, and scissors.
I'm sure I'll find more things to throw in there.

I'm usually sewing applique quilts that I design, but this one called my name.
I wish when it was calling my name that it had let me know that it has a gazillion
1-1/2" pieces in almost every block. They make me crazy...I like big pieces!


After having to use my seam ripper way too many times, I thankfully remembered to use
that fabulous glue stick to make all the seams match.
Dab a little on the seam and iron both layers for a few seconds to hold it in place.
After sewing them, I only had a couple that moved a bit and weren't spot on.

It made a fast job of  matching the seams in the stars and skirt. 


I started with the skirt because it was what got my attention in this pattern.
The directions in the pattern had pictures. I love picture directions!

I've been taking pictures of each section as I go along. I can't wait to finish it!


 Joan at Moosestash Quilting and Carla at Creatin' In The Sticks have been
working just like me to get ready for the Cackling Stitches BOM. We're very excited!


Joan and I have been thinking of blog hop challenges for next year.
We're almost ready with those, too!
Here's a sneak peek for January. Details will be released soon.


The rest of the year will have these blog hop happenings:


I hope you join us next week for Monster Mash!

Monday, October 9, 2023

Thanksgiving Turkey Escape Table Runner

When new fabric from Benartex arrives on my doorstep, I love the process of figuring out what to do with it. This beautiful array of their "Harvest Festival" by Kansas Studios was easy to be creative with! 

The fabric has metallic accents that give off an amazing sparkle when the light hits them. These are the fabrics I used, along with Benartex's "New Hue" basic line fabrics.


Here are more of the "Harvest Festival" fabrics and the "New Hue" colors I used.


Years ago I made a Thanksgiving table runner that I loved, but felt it needed some changes and updating. "Harvest Festival" gave "Thanksgiving Turkey Escape" a bolder look.

"Thanksgiving Turkey Escape"
15" x 45" table runner


This turkey knows it's time to escape the farm!


The truck may be empty of pumpkins by the time it gets to the farm and diner.


Does applique scare you or seem a bit hard? I don't like to do anything the hard way,
so here's a few tips on how I do my applique projects.

Tracing or printing? 
I trace big applique pieces on large sheets of Heat n Bond iron-on adhesive, but I really prefer to print them using my inkjet printer. Heat n Bond has some printable sheets that make copying designs so easy. No pencil needed!


Trace or print applique designs on smooth side of iron-on adhesive. Make sure designs are reversed so they will be the correct direction when ironed on fabrics. (This pattern already reversed the applique designs.) 

Cut around traced applique designs leaving at least a quarter inch from solid line. Hint: Writing the desired fabric color on the paper applique piece can avoid confusion when ironing to fabric. 


Iron applique designs (rough side down) to wrong side of fabrics following package directions. Let cool. 


Cut out applique pieces on solid lines. I like to cut my pieces out on a tray so I don't lose any of the tiny designs. Those purple Karen Kay Buckley's Perfect Scissors with serrated blades have become my new favorite for cutting out applique.


TIP 1: Ironing a lightweight interfacing on the back of applique blocks adds stability when stitching around fabric pieces. It can shrink the fabric about 1/4" so it is suggested you iron it on before you cut the fabric to required size or see TIP 2.


TIP 2: Cutting the background fabric 1” larger for applique blocks allows for shrinkage. Trim blocks to correct size after stitching around applique designs.

TIP 3: A heatproof sheet is a great tool for assembling the pieces before ironing them to your fabrics. This one is available in most craft or quilt stores, and on Amazon.


*If available with your pattern, place the full size applique key underneath the sheet. Tape or use a glue stick if pieces indicated needing to be placed together. If it doesn't come with a full size key, don't get shook up about having the pieces in exactly the same position as the pattern photo. As long as they overlap slightly as indicated, it's okay if they are more left or right than the original design. 

Peel off paper liner from the backs of applique pieces. Follow design keys for correct placement. Place cut out applique designs on the heatproof sheet and lightly press them in place (do not do it for too long.) Make sure they slightly overlap if indicated in the keys. 


Continue layering designs from the back to the front.


Let cool...this step is important! Carefully peel off the applique from the sheet and place it, adhesive side down, on right side of background fabric. Press according to package directions until entire piece is bonded. Let cool. 


Repeat with remaining applique blocks following pattern directions. 


*The truck block needs sashing between two blocks before adding applique. 
Some of the pumpkins are added after borders are sewn on.


What thread color and weight should I use?

You can choose thread that is the same color as your fabric if you want it to blend and not stand out. Black thread definitely defines applique more. Flowers can look more delicate if you use the same color thread, but darker colors can give them a bolder definition. It's entirely up to you! Audition a couple different ways if you can't decide.

The weight of the thread depends on how much you want it to show. You can use 50, 40, or even 28 weight thread...the smaller the number, the heavier the thread. Aurifil 50 weight black thread was used for applique on this table runner.

Does bobbin thread have to match the thread on top?

If you're using black thread for all the applique, use black thread in the bobbin. If you'll be stitching the applique pieces with thread that matches the fabric, use a white or beige thread in the bobbin but be sure to lessen the tension so the bobbin thread doesn't pull up.

Does raw edge applique have to be blanket stitched?

Raw edge applique can be sewn down with a blanket stitch, straight stitch, or even a zig zag stitch. Whatever stitch you use, place the needle in the down position while appliqueing to keep fabric from moving when you pause or turn corners. Take a few straight stitches along edge of applique and then begin blanket stitching (or the stitch you choose.) A slow to moderate speed is best to keep stitches accurate. Once you master the blanket stitching, you will find that you can go faster. 

Do stitches have to be all the same size or type?

Not at all! When stitching around small applique pieces or pieces that come to a point, it is good to shorten the length a little. That way you don't just see stitches, you can see the fabric. You can also use straight stitching around some of the smaller pieces that would be too difficult with blanket stitching.


Do accents or lines have to be embroidered by hand?

Nope, but if you're good at it, go for it. You can free motion or straight stitch decorative lines with a sewing machine.

Once you've appliqued, stitched, and sewn on borders, quilt and add binding using your favorite method. 


You can find "Thanksgiving Turkey Escape" in my Etsy store HERE.


My Day In "April Showers" Blog Hop

Joan at Moosestash Quilting keeps me on my toes with her challenges, that's for sure.  JOAN'S APRIL BLOG HOP CHALLENGE:  "APRIL...